Originally my BC-Racing coilovers were meant for Nissan S13. Spring rate was way too hard for S30, so I changed softer springs. Originally springs were 8kg/mm in front and 6kg/mm in rear. I used 4kg/mm in front and 5kg/mm in rear and now it is perfect.
Also tried few laps in our local car club track day.
Photo credits goes for Ville Järvenpää.
sunnuntai 18. toukokuuta 2014
sunnuntai 11. toukokuuta 2014
Six months after I started this project car is finally in driving condition. There is still some interior parts that are not mounted but at least I can drive it now.
Also found out that suspension is way too hard, so need to get new softer springs.
If you compare these pics that were taken when car was still in US I hope you can find some improvement. :)
Also found out that suspension is way too hard, so need to get new softer springs.
If you compare these pics that were taken when car was still in US I hope you can find some improvement. :)
keskiviikko 23. huhtikuuta 2014
Brakes
Originally 240Z has brake disks in front, and drum brakes in rear. In my car drum brakes were already changed to brake disks and master cylinder was upgraded to larger originally found from 280zx turbo. However front brakes were original with non-vented disks and also brake booster was smallest that S30 has to offer, so I decided to upgrade those.
As brake booster I used largest that S30 has had, it is 10" diameter and found from 2+2 260Z. Master cylinder is 15/16".
In front I used Outlaw 2000 4-pot calipers. They are aluminium and weight only 1.3kg/piece. As disks I used Audi A4 312x25mm front disks that were made smaller with lathe so they can fit inside 15" wheel. Final diameter is 290mm.
Caliper carrier is cut from 12mm steel. I used new EBC redstudd pads and braided brake hoses.
Rear brakes are from 280ZX turbo.
As brake booster I used largest that S30 has had, it is 10" diameter and found from 2+2 260Z. Master cylinder is 15/16".
In front I used Outlaw 2000 4-pot calipers. They are aluminium and weight only 1.3kg/piece. As disks I used Audi A4 312x25mm front disks that were made smaller with lathe so they can fit inside 15" wheel. Final diameter is 290mm.
Caliper carrier is cut from 12mm steel. I used new EBC redstudd pads and braided brake hoses.
Rear brakes are from 280ZX turbo.
sunnuntai 9. maaliskuuta 2014
Interior
When I bought my Datsun it has interior that was not in very good shape. Dash and seats were cracked and all floor mats needed to be replaced.
Seats and floor mats were easy to repair. You can buy new covers for seats and new floor mats and in my opinion they also look quite good. There is some wrinkles in seats but at least they are crack free now. Seat straps were also in bad condition, so I replaced them.
For dash there is available new covers that are made from plastic and are glued in. However I took different approach repairing my dash. I cut and taper those cracks so that they were little bit wider. After that I used fiberglass to fill those cracks and on top of that I used fiberglass filler to smooth everything.
After filler was sanded I painted whole dash with plastic paint. It turned to be quite good and time will tell how long it will last. However if it cracks again I could always use that plastic cover.
I also replaced my original speedo and tach. I used Speedhut gauges that are said to be good quality. And those can also be customized different lighting color, different tick style, font, etc. Both my gauges are 4" Revolution series.
In place of original speedo I used GPS speedo and tachometer. Because it is GPS I don´t need to use speedocable. In place of original tacho I used quad gauge where is oil psi, water temp, fuel level and volt meter. Both are with green background light to maintain original look.
Seats and floor mats were easy to repair. You can buy new covers for seats and new floor mats and in my opinion they also look quite good. There is some wrinkles in seats but at least they are crack free now. Seat straps were also in bad condition, so I replaced them.
For dash there is available new covers that are made from plastic and are glued in. However I took different approach repairing my dash. I cut and taper those cracks so that they were little bit wider. After that I used fiberglass to fill those cracks and on top of that I used fiberglass filler to smooth everything.
After filler was sanded I painted whole dash with plastic paint. It turned to be quite good and time will tell how long it will last. However if it cracks again I could always use that plastic cover.
I also replaced my original speedo and tach. I used Speedhut gauges that are said to be good quality. And those can also be customized different lighting color, different tick style, font, etc. Both my gauges are 4" Revolution series.
In place of original speedo I used GPS speedo and tachometer. Because it is GPS I don´t need to use speedocable. In place of original tacho I used quad gauge where is oil psi, water temp, fuel level and volt meter. Both are with green background light to maintain original look.
sunnuntai 9. helmikuuta 2014
Coilovers
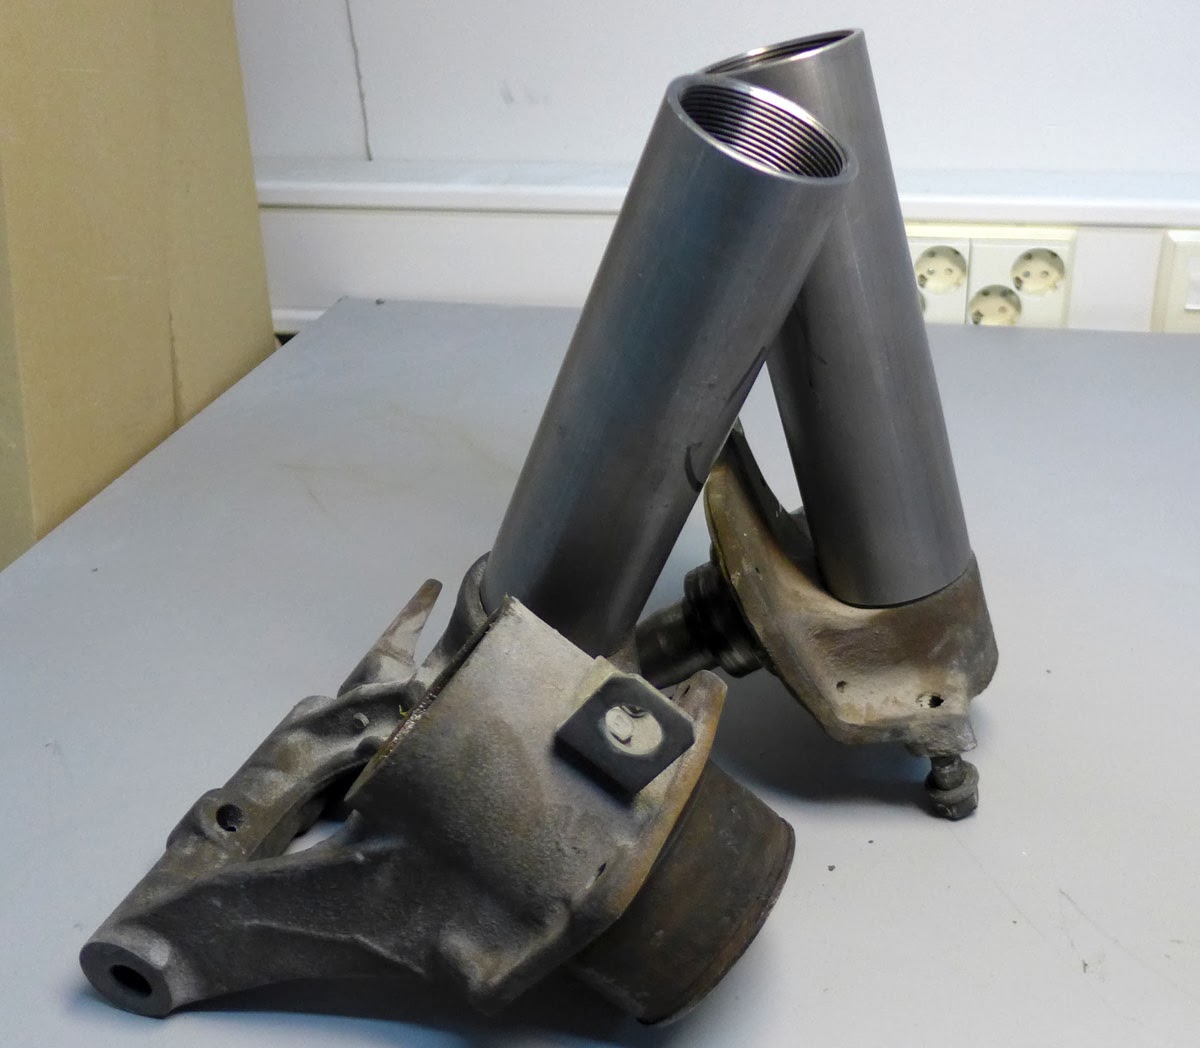
To get ride height that I would prefer I needed coilovers for my Datsun. There are not many off the shelf coilovers for S30, so I decided to try Nissan S13 BC racing coilovers. To use them in my Datsun I needed cut original strut tube and use threaded collar that is pressed and welded in.
My friend made those collars with lathe and I just welded them in place.
maanantai 3. helmikuuta 2014
The Wheels
Here are
new wheels for my Datsun. Well not new as they are maybe over 20 years old, but
new for me anyway. I bought these wheels even before I got the
car, but now I finally find time to refurbish them. I have always liked these old BBS
multi-piece wheels. In my previous project car I had BBS RS´s and these are
RM´s. While they might be played out, at
least in German car scene, I like them and I think that they suit my Datsun
perfectly.
Wheels are
BBS RM 029 and they are 7.5 x 15” ET30. Bolt circle is 5x114.3, so I needed to
change original 4x114.3. In front I used Z31 hubs and in rear there were
drilled new holes. Originally these wheels have 1.25” lips and I wanted to have rear
wheel wider than front so I bought two new 2.5” lips.
Centres
were in pretty good original condition and I also liked that gold color, so I
didn´t painted them. Only thing that I needed to do was remove old lips, polish
those two that I was using in front and then put all parts together again.
First I
needed to part lip from center barrel. I used VW/Audi jack (AKA the Widowmaker)
which makes it very easy. That might be only thing that jack can be used for.
After that
I removed original lacquer with some paint remover that I could find from our
local hardware store.
After few hours
lips looked like this and lacquer could be easily washed away.
Then I wet sanded
and polished those lips and after that wheels could be re-assembled. I used new
stainless steel bolts.
And of course
I had to try them to car. Tyres are Toyo Proxes T1R 205/55 in front and 225/50
rear. I think that I get small spacer, maybe 5-10mm, in front but rear fitment
is perfect. I have never liked wheels that poke 20mm outside fenders so this is
perfect fitment for me.
This is drive height that I would like to have so I need to use coilovers, but more from that later.
torstai 30. tammikuuta 2014
Paintwork finished
Finally after countless hours of wet sanding and polishing my paintwork is finally done. It´s nowhere near perfect, but considering it was painted in my garage and there was lots of imperfections i´m very pleased with the result.
Here´s few before-shots. First is roof and all those white spots are dust and other trash.
C-pillar was maybe the worst. Lots of orange peel and large drip in lacquer.
Door before wet sanding.
Here´s door after it is wet sanded with 2000 grid.
And here´s body after wet sanding and polishing.
Here´s few before-shots. First is roof and all those white spots are dust and other trash.
Door before wet sanding.
Here´s door after it is wet sanded with 2000 grid.
And here´s body after wet sanding and polishing.
torstai 9. tammikuuta 2014
Paintjob
Sanding...filler...sanding...primer....sanding...primer...sanding....sanding....sanding.....sanding.......
That´s how I have spend last few weeks. Not my favourite part of this project, but it needs to be done.
All parts that could be removed from body were painted in my work where we have a small paint booth and rest of the body was painted in my garage where I made my own DIY "paintbooth".
After primer was sanded it was time for basecoat and clearcoat. That was done by my friend, because I didn´t trust my painting skills. There is lot of dust and other imperfections in that new paint surface so I need to wet sand and polish whole car....that's nice, more sanding for me. :)
Original color was 901 silver. Silver that I used is from Honda color chart, and is little bit more golden than original Datsun color. Color code is YR508M, Heather Mist.
That´s how I have spend last few weeks. Not my favourite part of this project, but it needs to be done.
All parts that could be removed from body were painted in my work where we have a small paint booth and rest of the body was painted in my garage where I made my own DIY "paintbooth".
After primer was sanded it was time for basecoat and clearcoat. That was done by my friend, because I didn´t trust my painting skills. There is lot of dust and other imperfections in that new paint surface so I need to wet sand and polish whole car....that's nice, more sanding for me. :)
Original color was 901 silver. Silver that I used is from Honda color chart, and is little bit more golden than original Datsun color. Color code is YR508M, Heather Mist.
perjantai 6. joulukuuta 2013
Bodywork - Part 2
Bodywork continues...
I used nylon brush to clean whole car to bare metal. There was not many dents, so there is no need for much bondo. Also there was almost not any rust found anywhere under paint.
Front air dam had some paint that was not solvent resistant. I needed to remove it all, so it does´t cause any problem when it is painted again.
Doors and hood were also almost rust free.
I used nylon brush to clean whole car to bare metal. There was not many dents, so there is no need for much bondo. Also there was almost not any rust found anywhere under paint.
Front air dam had some paint that was not solvent resistant. I needed to remove it all, so it does´t cause any problem when it is painted again.
Doors and hood were also almost rust free.
Tilaa:
Blogitekstit (Atom)